Create Openings for MEP Services
Introduction
This session will provide comprehensive, step-by-step guidance on how to create openings for MEP services using best practices.
Video Tutorial
User Interface

Step 1: Create one or multiple Opening Filters

Start ConVoid [Convert Void] and begin by creating an Opening Filter.
Create a new Opening Filter.
This filter will be used to define the conditions for the opening creation process. To create openings based on all MEP services, simply create a single filter. Alternatively, if you need to differentiate between MEP system types, disciplines, or models, create multiple filters, such as Ventilation and Plumbing. This can be beneficial if you want to avoid openings from the ventilation and plumbing systems joining automatically. In this case, we start with an Opening Filter for the ventilation system.
Duplicate an existing Opening Filter.
Rename an existing Opening Filter.
Delete an existing Opening Filter.
Save all Opening Filters in a *.xml file and use them in other projects.
Import an existing Opening Filter into your project from a *.xml file.
Step 2: Import ConVoid Families
If you still need to load the ConVoid families into your project, a window will appear, prompting you to do so.


Click [Yes], and the ConVoid library will open. If you're having trouble finding the families, simply click on the bottom link in the window or click the link provided here to download the library. Once downloaded, import the families listed in the window into your project.
Step 3: Set the Scope on where to create openings
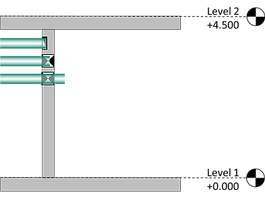
Continue by defining the upper and lower levels and may include an offset. ConVoid will then generate openings between these levels. If the Section Box in a 3-D View is activated, this option is grayed out, as the scope has already been set.

Step 4: Reference Projects, Categories and Elements
In this section, you must select the project(s) that include the Reference Elements, which refer to elements such as Ducts, Pipes, Cable Trays, and Insulation.
Choose the categories of Reference Elements. The common categories are Cable Trays, Ducts, Pipes, their Accessories, and Insulations. In the beginning, we suggest these categories and then incrementally add additional categories, such as Fittings. Since we are starting to create builders' work openings for the ventilation system, we will only select Ducts and Ducts Accessories.

Step 5: Host Projects, Categories and Elements
In the section below, you must select the project(s) that include the Host Elements, which refer to elements such as Walls, Floors, Beams, and Roofs.

Choose the categories of Host Elements where horizontal openings, such as wall openings, and vertical openings, such as floor openings, should be placed. Make a reasonable selection:
Create Horizontal Openings in:
Walls, Structural Framing, Structural Columns, etc.
Create Vertical Openings in:
Floors, Roofs, Stairs, etc.
Furthermore, clicking on the plus sign lets you select the family type to be considered in the creation process. If no family types are chosen, ConVoid will use all category elements. If you wish to exclude certain host elements from the creation process, we recommend checking out the session about excluding elements.
Step 6: Settings
You can change the ConVoid settings by clicking on the Toolbox. We'll go through the settings in a separate session to see how it will affect the creation process.
Step 7: Clash Detection
Click the Refresh Button to start the clash detection between the selected Reference- and Host Categories.
Step 8: Conditions and Parameter Filter
The Condition field will be enabled once the clash detection has been completed. Now you have to define the conditions of the openings.

Level for Horizontal Openings
Select the Level constraint for the horizontal openings:
-
We highly recommend selecting the Host Level as it provides the best results.
Host Level: By selecting <Host Level> the openings will follow the levels of the host element, such as the base and top level of the wall.
Other available options include:
-
Building Story: The openings will be constrained to the nearest upper and lower building story.
-
Reference Level: The openings will follow the level of the reference element.
-
Specific Level: The openings will be placed at a designated level of your choosing.
Level for Vertical Openings
Select the Level constraint for the vertical openings:
-
We highly recommend selecting the Building Story option, which provides the best results.
Building Story: By selecting <Building Story> the openings will be constrained to the nearest upper and lower building story.
Other available options include:
-
Host Level: The openings will follow the levels of the host element, such as the level of the floor.
-
Reference Level: The openings will follow the level of the reference element.
-
Specific Level: The openings will be placed at a designated level of your choosing.
Creation Mode
In the next step, you must choose the creation mode:

Opening
ConVoid will create penetrations that fully intersect the Host Element, even if the Reference Element does not penetrate the Host Element completely.

Recess
If the Reference Element does not fully intersect the host element, ConVoid will create a recess. However, if the Reference Element does intersect the Host Element, it will generate a penetration.
Auto
ConVoid will automatically decide whether to create a penetration or a recess based on the geometry of the Host and Reference Elements.
When running ConVoid for the first time, we recommend selecting the 'Opening' mode.
Rectangle and Circular Families
The rectangular and circular opening families will be automatically selected. You can duplicate or rename the ConVoid families to create new types. To do so, please refer to the Revit Families session.
Oversize
Set a minimum oversize to keep enough clearance space between the MEP Services and Host Elements. If you need to adjust the oversize of specific openings, you can use the Dimension Void feature after the openings are automatically placed.
Parameter Filter
Set your Parameter Filter. We recommend selecting the <All Reference Elements> parameter, which will use all Reference Elements to create the openings. However, suppose you want to run the process with a specific selection of Reference Elements, such as elements of the supply air system. In that case, you can use the 'System Classification' parameter and set its value to 'Supply Air'. The green symbol above indicates how many openings approximately will be created based on your parameter selection.
Add Opening Types
You can add and define more opening types by clicking on [Add horizontal opening type] and [Add vertical opening type].
Step 9: Start the Creation Process
Click [OK] to start the process of creating the openings. ConVoid will now place the openings automatically in your project. All your settings will be automatically saved by just clicking [OK].
The openings are displayed as symbols in the 2-D view. The families contain a variety of symbols, which you can select according to your needs; please refer to the session Family Symbols. In a 3-D view, the openings are represented as solids.

Step 10: Add more Opening Filters
After the placement of the openings, you can run ConVoid with a different filter. We will create one for the plumbing and electrical system in this example.
-
Open ConVoid and create a new Opening Filter. Alternatively, you can duplicate and rename an existing filter.
-
Next, select the relevant categories for your filter and run ConVoid again.
-
Repeat this process as many times as needed to create additional filters for your project.